Apple’s Mac ecosystem is a very nice one, particularly should you’re all in and have an iPhone, Apple Watch or different Apple gadgets to loop into your system. It will probably typically be somewhat complicated for individuals who are new to Apple to work out how staple items are executed, although. One instance is taking a screenshot or display screen snip.

How to take a screenshot on the iPhone SE
Right here is the way to take a screenshot on the iPhone SE (2020), iPhone SE (2022), or some other Contact ID iPhone, just like the iPhone 6, 7 or 8.
There are two principal methods to take a screenshot on a Mac — with the Screenshot app or by utilizing keyboard shortcuts. The method utilizing the Screenshot app is less complicated to recollect and in addition homes further choices like display screen recordings. The keyboard shortcuts, then again, are usually sooner. We’ll information you thru the way to take screenshots on a Mac together with useful methods you are able to do with that ensuing snip.

How one can take a screenshot on a Mac utilizing the app
On each Mac, there’s an app actually known as Screenshot that may deal with your entire snipping and screenshot wants, in addition to letting you file your display screen or a portion of it. Utilizing the Screenshot app offers you clear choices over utilizing keyboard shortcuts, though when you study the keyboard shortcuts, you will overlook all in regards to the app as a result of it is a lot faster to press a few keys. That mentioned, let’s check out all of the other ways to take a screenshot in your Mac.

Pocket-lint
To take a screenshot on Mac utilizing the built-in app, you will first must know the place to seek out and open it. There are just a few totally different strategies:
- You possibly can press Command + Shift + 5 if you wish to get used to keyboard shortcuts straight away.
- You need to use the Highlight device (press Command + Spacebar to launch it) then seek for Screenshot and open the app.
- You possibly can open the Finder app then go to Utilities and double-click on the Screenshot app.

After opening the Screenshot app, a small toolbar will seem in your display screen, offering you with varied screenshot instruments and choices. You possibly can click on and drag the toolbar round your display screen if it’s worthwhile to get it out of the way in which, for instance. For those who’re not sure what every button does, hover your mouse over every icon, and you will notice the title of every possibility. This is a fast rundown of what every device does when you click on on it:
- Seize Complete Display screen: This captures your complete display screen — if in case you have a number of apps on the display screen, it can seize all of them. That is additionally the choice that you really want if you wish to embrace any open menus or pop-ups together with the remainder of the knowledge on the display screen.
- Seize Chosen Window: This captures just one window. In case you have a number of apps open however solely desire a screenshot of 1, select this selection. You may as well use this selection to take a screenshot of simply the menu or completely a pop-up window.
- Seize Chosen Portion: Generally known as the snip device on a Mac, this selection means that you can draw a field across the portion of the display screen that you simply need to seize, as a substitute of all the display screen or window. Select this one when you do not want all the display screen recorded.
- You will additionally see two icons for display screen recordings — these are movies relatively than screenshots, which we’ll focus on intimately under.

While you click on on any of the respective icons, the Screenshot app behaves accordingly. This is what you’ll be able to count on for every possibility:
- For Seize Complete Display screen or Seize Chosen Window, hover the mouse over the display screen you want to seize — the cursor will flip right into a digicam icon — click on your mouse or touchpad to set off it.
- Click on the Seize or File button on the toolbar for the respective choices.
- After clicking, your screenshot will by default be saved to the desktop. You may additionally see a preview of the picture within the backside proper nook — you’ll be able to click on and drag on this thumbnail and place it in an open doc, a message or e mail.
- Or, you’ll be able to click on on it to open the file and see the macOS Markup device to attract or write on it with a digital pen, additional edit after which share it.
- To get the thumbnail preview off your display screen, swipe proper on the touchpad or wait just a few seconds, and it’ll disappear by itself.
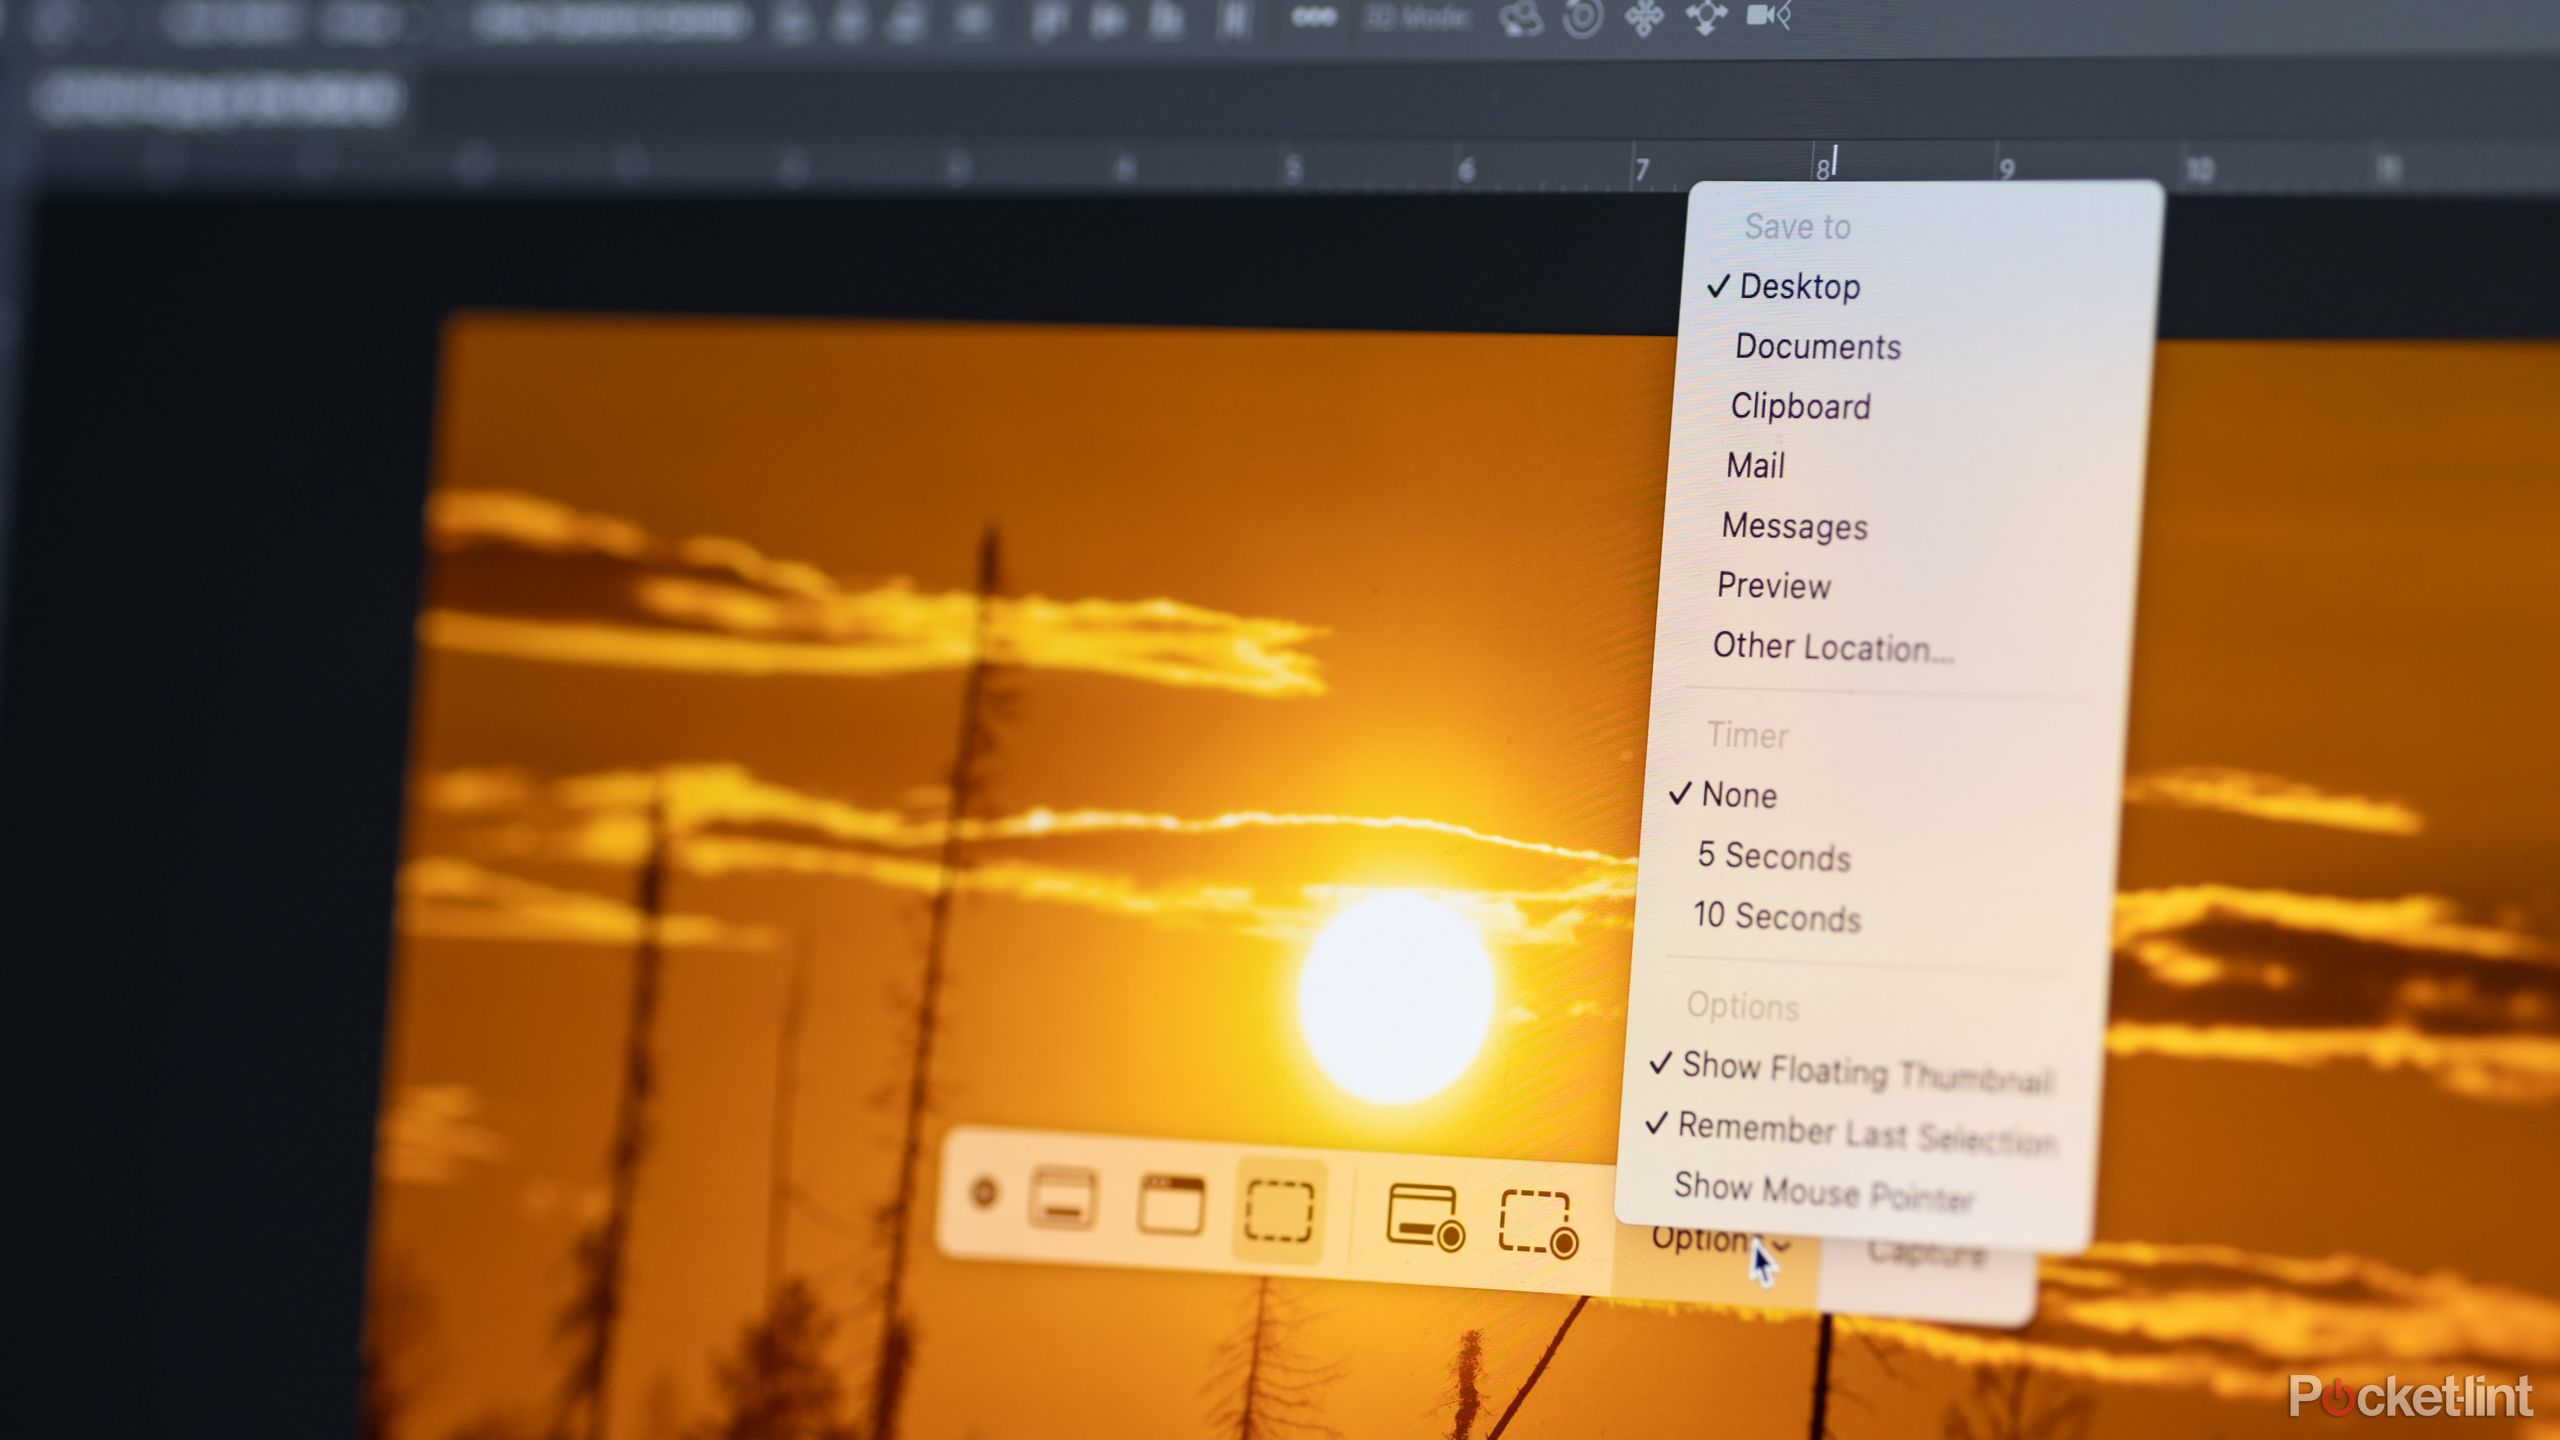
Elective: Use the
Choices
drop-down menu to regulate your preferences. Right here, you’ll be able to select the place to save lots of the ensuing file and whether or not a preview of the picture hovers within the nook of your display screen after taking the screenshot.
 How one can take a screenshot on a Mac utilizing keyboard shortcuts
Whereas utilizing the Screenshot app is easy and straightforward to recollect, macOS’s keyboard shortcuts are the quickest strategy to take a screenshot.
- Shift + Command + 5 will open up the Screenshot app.
- Shift + Command + 3 will take a screenshot of your complete display screen.
- Shift + Command + 4 will take a partial screenshot, turning your mouse pointer right into a crosshair to pick out your space of selection. Transfer your mouse to 1 nook of what you want to seize, click on, then drag till you have chosen the specified space. When you let go of your mouse, the screenshot is captured.
- To take a screenshot of a particular window, a menu merchandise, or a pop-up window, press Shift + Command + 4, then, as soon as your cursor adjustments to the crosshair pointer, press the area key. Transfer your mouse to the window, menu, toolbar or pop-up window that you simply’d wish to seize and click on on it.

Best MacBook laptops: Expertly tested and ranked
MacBooks are highly effective machines that professionals use to get work executed. Listed here are the perfect ones accessible now.
 How one can display screen file on a Mac
Whilst you can simply take a photograph of your display screen on a Mac utilizing simply keyboard shortcuts, to take a video of your display screen, you will want to make use of the Screenshot app.
- Use the search device within the nook and kind in Screenshot, or use Shift + Command + 5 to open the app.
- Within the toolbar that pops up, the primary three choices are for photographs, however the subsequent two are for recording a video, designated by the small circle file icon within the nook. Select one in all these two choices — if you’re not sure what the icon means, maintain the mouse over the icon and the reason will pop up:
- File Complete Display screen: This feature begins a recording or video of your complete display screen. In case you have a number of apps open, all of them can be a part of the recording.
- File Chosen Portion: Use this device if you wish to create a video of a small portion of your display screen relatively than all the display screen. The whole lot within the drawn-out window can be recorded. For instance, should you do not need to embrace the Dock with the apps and minimized home windows in your recording, it is best to use this selection.
- Click on the File button on the toolbar.
- You are now recording — do no matter it’s that you simply want to file.
- If you find yourself completed recording, press the cease icon that’s within the prime toolbar, in the direction of the precise.

How do you copy and paste a screenshot on Mac?
While you take a screenshot on a Mac, a thumbnail preview will stay within the nook of the display screen. You possibly can drag and drop that small preview into an open Pages document or an open e mail to rapidly add the picture to what you might be already engaged on.
The opposite possibility is to repeat and paste the screenshot. To try this, you will observe the steps above, besides if you click on to take the screenshot, maintain down the management key. That copies the screenshot routinely. Then, you need to use the command + V keyboard shortcut to stick the screenshot within the desired spot.
The place do screenshots go on a Mac?
By default, the screenshots on a Mac are saved to the desktop. Nevertheless, it’s attainable to vary the place the ensuing photos are saved. Whereas within the Screenshot app, click on on “choices” to decide on a brand new location to save lots of the recordsdata to.
How do you crop a screenshot on a Mac?
The simplest strategy to crop a screenshot on a Mac is to make use of the Seize Chosen Portion device in Screenshot, or the Shift + Command + 4 keyboard shortcut. This lets you draw a field round what you need to embrace, so you will not must crop it later.
If you wish to crop an present screenshot, you will want a photo editor. However, the Preview app that comes together with your Mac will work.
- Double-click the file to open it in Preview.
- Head to Instruments > Rectangular Choice.
- Draw a field across the a part of the screenshot that you simply want to hold.
- Lastly, use Instruments > Crop or the keyboard shortcut Command + Okay to crop.
Trending Merchandise